
Permissions and Requirements
- Schema changes require the Schema Master role holder DC to be online and available.
- You must be a member of Schema Administrators or Enterprise Administrators group.
- I would recommend performing this operation on Schema Master role holder DC.
Register Schema snap-in
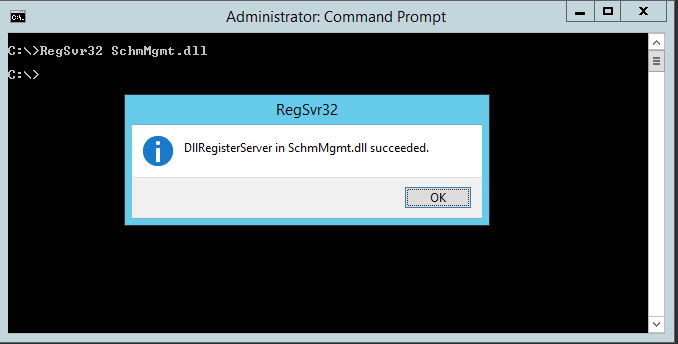
- Open cmd as administrator.
- Type RegSvr32 SchmMgmt.dll command and hit enter.
- You should get the DllRegisterServer in SchmMgmt.dll succeeded
Adding Custom Attributes
- Press the keys ‘Windows‘ + ‘R‘ to open Run dialog.
- Type in mmc and hit enter.
- Go to File -> Add/Remove snap-in… or simply press the keys ‘Ctrl’ + ‘M’ to open Add/Remove snap-in.
- Select the snap-in Active Directory Schema, click Add >, and click the button OK.
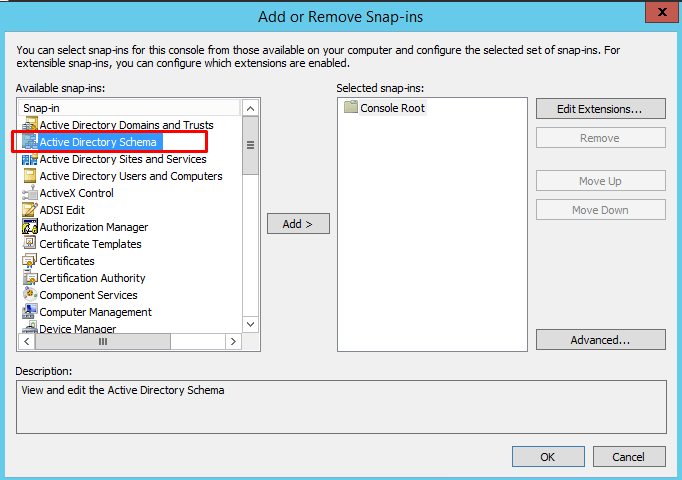
Add the active directory schema snap-ins
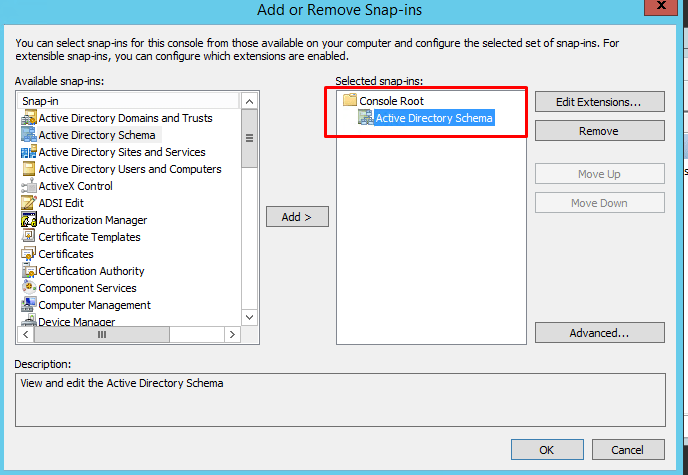
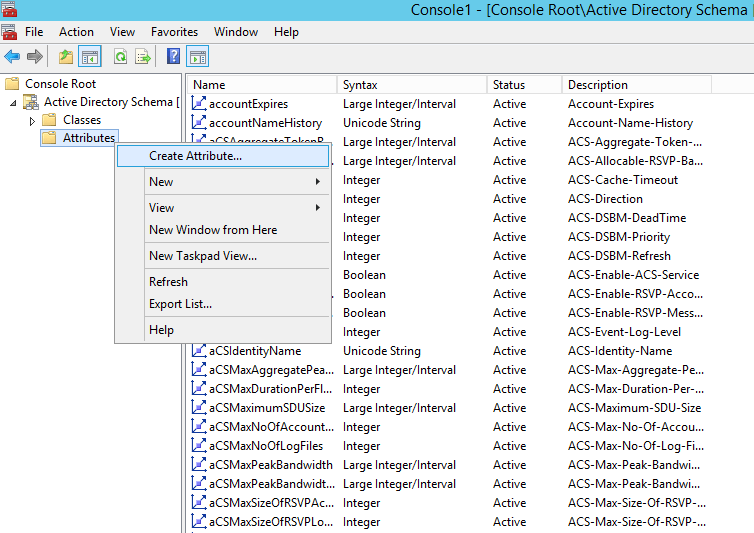
- Expand the Active Directory Schema option, right-click the Attributes and click Create Attribute.
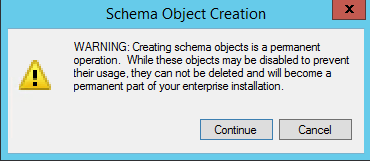
You will receive Schema Object Creation warning message indicating that creating schema objects is a permanent operation. Click Continue to proceed.
Now you will see the following Create New Attribute window.
Enter the Common Name, LDAP Display Name. For example, if you want to create a custom attribute with the name msRTCSIP-PrimaryUserAddress , type in Primary_User_Address in Common Name field and msRTCSIP-PrimaryUserAddress in LDAP Display Name field. Note that LDAP Display Name field does not contain empty space.
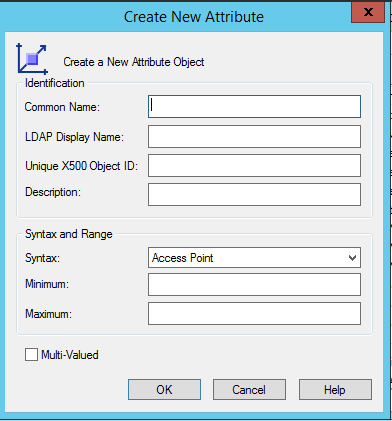
Unique X500 Object ID or OID field will contain the unique ID of object. To generate the OID, run the below script on the PowerShell with admin privileges or use the other script as .vbs.
#---

$Prefix="1.2.840.113556.1.8000.2554"

$GUID=[System.Guid]::NewGuid().ToString()

$Parts=@()

$Parts+=[UInt64]::Parse($guid.SubString(0,4),"AllowHexSpecifier")

$Parts+=[UInt64]::Parse($guid.SubString(4,4),"AllowHexSpecifier")

$Parts+=[UInt64]::Parse($guid.SubString(9,4),"AllowHexSpecifier")

$Parts+=[UInt64]::Parse($guid.SubString(14,4),"AllowHexSpecifier")

$Parts+=[UInt64]::Parse($guid.SubString(19,4),"AllowHexSpecifier")

$Parts+=[UInt64]::Parse($guid.SubString(24,6),"AllowHexSpecifier")

$Parts+=[UInt64]::Parse($guid.SubString(30,6),"AllowHexSpecifier")

$OID=[String]::Format("{0}.{1}.{2}.{3}.{4}.{5}.{6}.{7}",$prefix,$Parts[0],$Parts[1],$Parts[2],$Parts[3],$Parts[4],$Parts[5],$Parts[6])

$oid

#---
' THIS CODE AND INFORMATION IS PROVIDED "AS IS" WITHOUT WARRANTY OF ANY KIND, EITHER EXPRESSED
' OR IMPLIED, INCLUDING BUT NOT LIMITED TO THE IMPLIED WARRANTIES OF MERCHANTABILITY AND/OR
' FITNESS FOR A PARTICULAR PURPOSE.
'
' Copyright (c) Microsoft Corporation. All rights reserved
' Improvements made by Ryein C. Goddard
'
' This script is not supported under any Microsoft standard support program or service.
' The script is provided AS IS without warranty of any kind. Microsoft further disclaims all
' implied warranties including, without limitation, any implied warranties of merchantability
' or of fitness for a particular purpose. The entire risk arising out of the use or performance
' of the scripts and documentation remains with you. In no event shall Microsoft, its authors,
' or anyone else involved in the creation, production, or delivery of the script be liable for
' any damages whatsoever (including, without limitation, damages for loss of business profits,
' business interruption, loss of business information, or other pecuniary loss) arising out of
' the use of or inability to use the script or documentation, even if Microsoft has been advised
' of the possibility of such damages.
' ----------------------------------------------------------------------
Function GenerateOID()
'Initializing Variables
Dim guidString, oidPrefix
Dim guidPart0, guidPart1, guidPart2, guidPart3, guidPart4, guidPart5, guidPart6
Dim oidPart0, oidPart1, oidPart2, oidPart3, oidPart4, oidPart5, oidPart6
On Error Resume Next
'Generate GUID
Set TypeLib = CreateObject("Scriptlet.TypeLib")
guidString = TypeLib.Guid
'If no network card is available on the machine then generating GUID can result with an error.
If Err.Number <> 0 Then
Wscript.Echo "ERROR: Guid could not be generated, please ensure machine has a network card."
Err.Clear
WScript.Quit
End If
'Stop Error Resume Next
On Error GoTo 0
'The Microsoft OID Prefix used for the automated OID Generator
oidPrefix = "1.2.840.113556.1.8000.2554"
'Split GUID into 6 hexadecimal numbers
guidPart0 = Trim(Mid(guidString, 2, 4))
guidPart1 = Trim(Mid(guidString, 6, 4))
guidPart2 = Trim(Mid(guidString, 11, 4))
guidPart3 = Trim(Mid(guidString, 16, 4))
guidPart4 = Trim(Mid(guidString, 21, 4))
guidPart5 = Trim(Mid(guidString, 26, 6))
guidPart6 = Trim(Mid(guidString, 32, 6))
'Convert the hexadecimal to decimal
oidPart0 = CLng("&H" & guidPart0)
oidPart1 = CLng("&H" & guidPart1)
oidPart2 = CLng("&H" & guidPart2)
oidPart3 = CLng("&H" & guidPart3)
oidPart4 = CLng("&H" & guidPart4)
oidPart5 = CLng("&H" & guidPart5)
oidPart6 = CLng("&H" & guidPart6)
'Concatenate all the generated OIDs together with the assigned Microsoft prefix and return
GenerateOID = oidPrefix & "." & oidPart0 & "." & oidPart1 & "." & oidPart2 & "." & oidPart3 & _
"." & oidPart4 & "." & oidPart5 & "." & oidPart6
End Function
Set oShell = WScript.CreateObject ("WScript.Shell")
oShell.run "cmd /c Regsvr32 Schmmgmt.dll"
Set objFSO=CreateObject("Scripting.FileSystemObject")
outFile="C:\oidInfo.txt"
Set objFile = objFSO.CreateTextFile(outFile,True)
'Output the resulted OID with best practice info
oidText = "Your root OID is: " & VBCRLF & GenerateOID & VBCRLF & VBCRLF & VBCRLF
objFile.Write oidText
objFile.CloseUnder Syntax field select type of data the attribute will hold. As per our example, Campus Name would hold String value. So, we will select Unicode String from dropdown. If you believe that the attribute will hold multiple values, enable the checkbox Multi-Valued. You can also specify the Minimum and Maximum length.
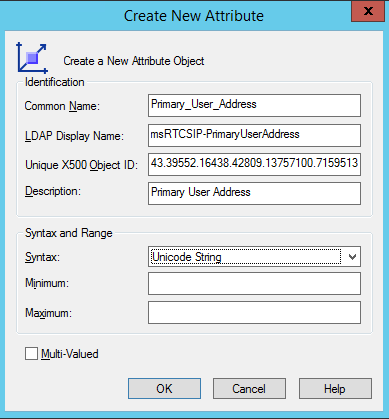
- After filling up the information, click OK.
- Now your newly created attribute will be available under Attributes
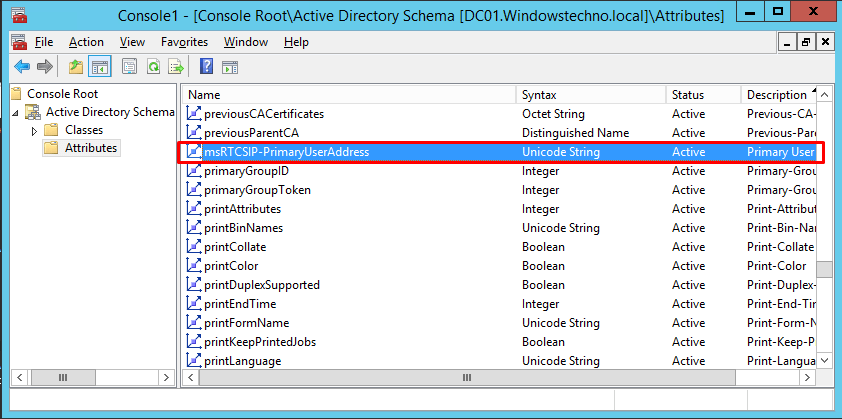
Keep the mmc console open as you will again need it to assign the attributes to User class.
Assigning Custom Attributes To User class
You have just created the attributes but these attributes must be assigned to user class before you can set these attributes via Active Directory Users and Computers tool.
To assign newly created attributes to User class follow the steps below:
- Go to Classes node in console and select user
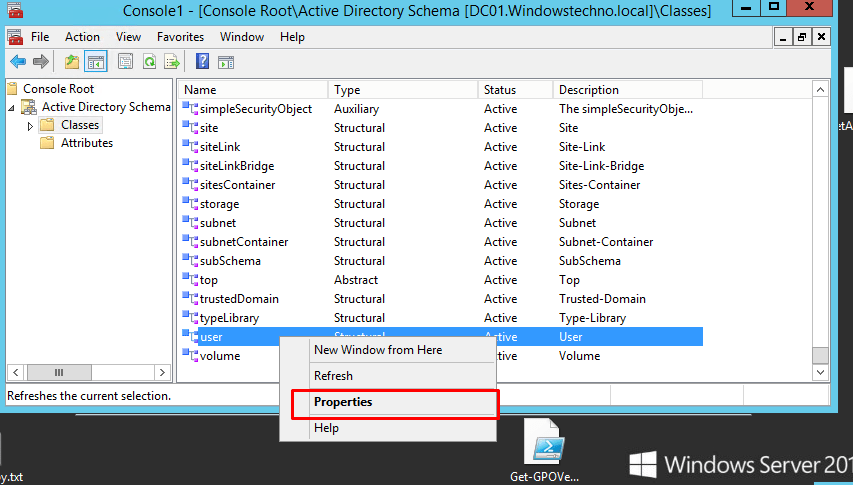
On user properties window, go to Attributes tab
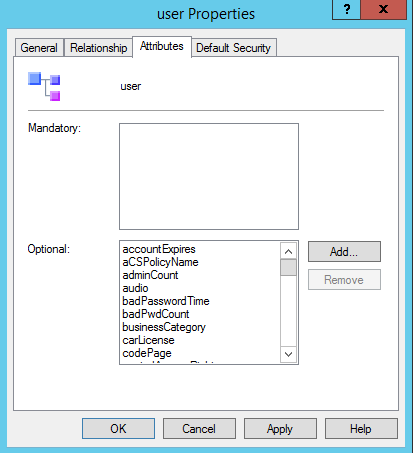
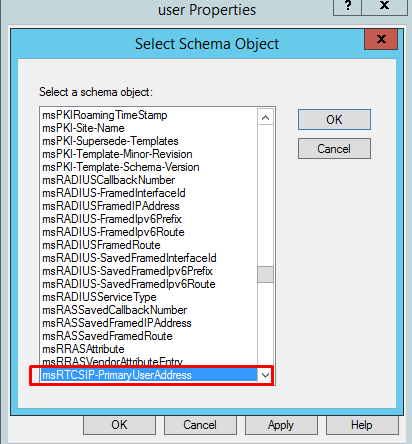
Click Add button and select the newly created attributes msRTCSIP-PrimaryUserAddress ). In the similar manner, add all the attributes created and click OK.
Click on OK
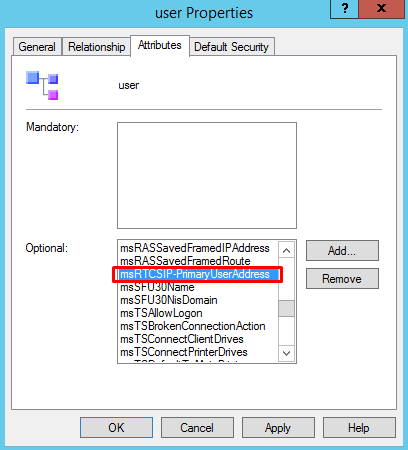
Click on Apply and OK.
Now wait for sometime so that the new attributes get replicated to all DCs.
Restarting Active Directory Domain Services
Now that you have successfully created custom attributes, you need to restart the Active Directory Domain Services for schema changes to take effect.
- Press the keys ‘Windows‘+ ‘R‘ to open Run dialog.
- Type the command services.msc and hit OK.
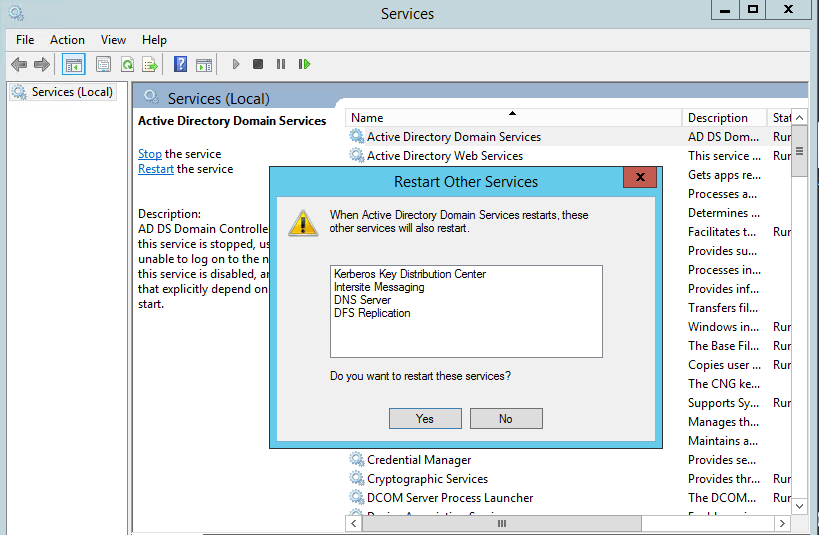
- Right click the Active Directory Domain Services service, click Restart. When prompted, click Yes to restart all the dependent services.
Verify new attributes in Active Directory Users and Computers
To verify if new attributes are available to be set for users, open Run dialog and type dsa.msc to open Active Directory Users and Computersconsole.
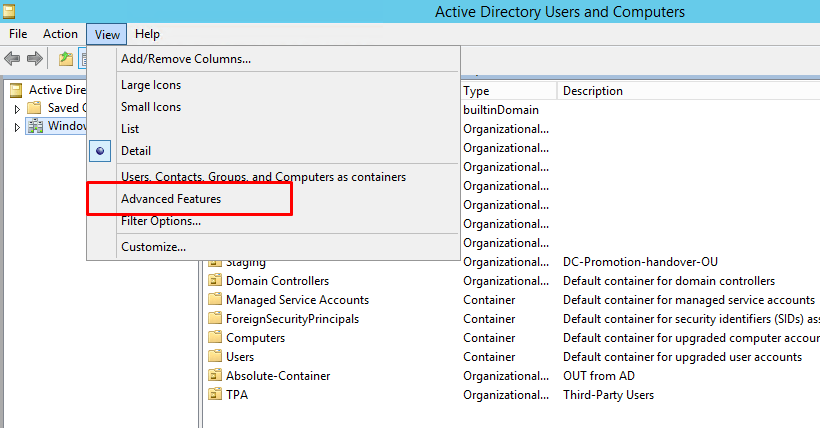
- Be default, Active Directory Users and Computers console does not show Attribute editor open under user properties. To active this option, click View menu option and select Advanced Features.
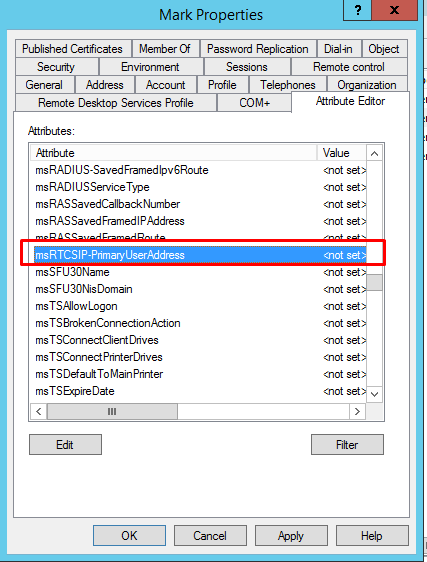
Now right click any user account and select Properties
On user properties window, select Attribute Editor Scroll down to see your custom attribute.
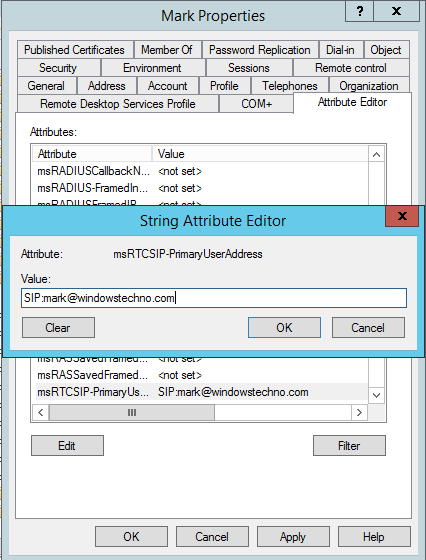
Double click the attribute name to set its value and click OK to save.
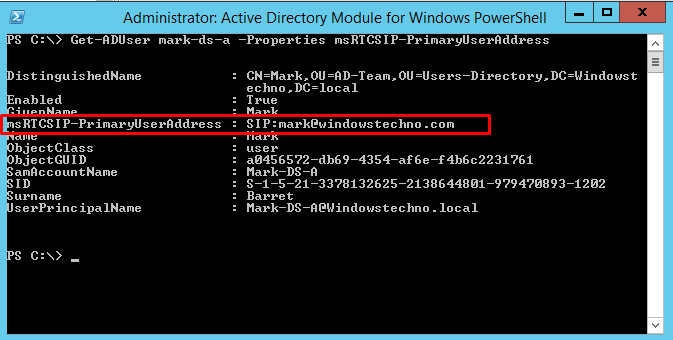
To list the custom attributes for a particular user, use the following command:
Get-ADUser username -Properties msRTCSIP-PrimaryUserAddress
This is how you can modify the Active Directory Schema if your organizational requirement want you to add custom attributes that are not available in Active Directory by default.
https://windowstechno.com/custom-attributes-creation-in-active-directory/